Table of Contents
Why Dryer Roll Inspections Are So Important
Dryer rolls are a key part of the paper-making process. These rolls help dry the paper during production, ensuring the final product is strong and ready for the next steps. That’s why regular dryer roll inspections are essential for keeping paper mills running smoothly and safely.
However, many inspections still rely on outdated methods like standard calibration settings. These methods often result in inaccurate readings, increasing the risk of undetected wear or damage. This can lead to unexpected downtime, costly repairs, or even safety hazards.
In this guide, we’ll explain the challenges of traditional inspection methods and explore how advanced solutions like the D2S System provide more accurate and reliable results.
The Problem with Traditional Dryer Roll Inspections
Standard Calibration Isn’t Enough
Many paper mills use standard calibration settings to inspect dryer rolls, especially those made of cast iron. While convenient, these settings don’t account for the unique properties of cast iron rolls. Cast iron has different velocities and wear patterns, so generic calibration often fails to capture accurate measurements. This can lead to:
• Inconsistent readings, resulting in undetected wear or damage.
• Missed defects, increasing the likelihood of equipment failure.
The Risks of Inaccurate Inspections
Relying on inaccurate inspections poses several risks, including:
• Costly Repairs: Unnoticed defects can worsen over time, leading to expensive and time-consuming repairs.
• Unexpected Downtime: Equipment failures disrupt production schedules, delaying orders and reducing profitability.
• Worker Safety Concerns: Damaged rolls compromise safety, creating potential hazards for employees.
The Role of Snell’s Law in Dryer Roll Inspections
What is Snell’s Law?

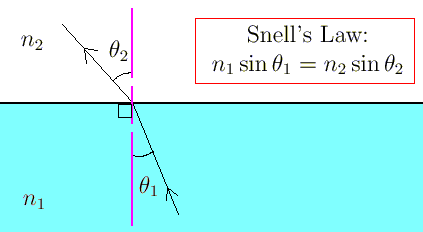
Snell’s Law, also known as the Law of Refraction, is a principle that explains how waves bend when transitioning between two different media. It defines the relationship between the angles of incidence and refraction and the refractive indices of the media. The equation is written as:
n_1 \sin \theta_1 = n_2 \sin \theta_2
Where:
• n_1 and n_2 are the refractive indices of the two media.
• \theta_1 is the angle of incidence.
• \theta_2 is the angle of refraction.
Why It Matters for Inspections
Ultrasonic testing relies on understanding how sound waves propagate through different materials. When ultrasonic waves encounter the interface between materials (e.g., cast iron and couplant), they refract based on the principles of Snell’s Law. This refraction impacts the accuracy of measurements, making it critical to account for material-specific velocities and angles.
The D2S System uses advanced technology to calibrate for these refractive effects, ensuring precise wave transmission and reducing errors caused by standard calibration methods. By incorporating Snell’s Law into its analysis, the system achieves unmatched accuracy in detecting defects and wear patterns.
A Better Way: The D2S System for Dryer Roll Inspection
The D2S System is an advanced inspection solution designed to overcome the challenges of traditional methods. When paired with the X3 Spider scanner and Analyst X software, it ensures precise, reliable results tailored to the unique properties of cast iron rolls.
What Makes the D2S System Different?
1. Custom Calibration Settings: The system adjusts to each roll’s specific material properties, eliminating the guesswork of standard calibration.
2. Advanced B-Scan Technology: Provides detailed, accurate readings to identify wear patterns and defects.
3. User-Friendly Design: Portable and easy to operate, making it ideal for field use in demanding environments.
4. Reliable Data Insights: Analyst X software processes data in real time, giving you actionable insights for maintenance planning.
Real-World Results: How the D2S System Helps Paper Mills
A paper mill in the Midwest recently adopted the D2S System for their dryer roll inspections. Before switching, they struggled with inconsistent readings and frequent breakdowns using standard calibration methods. After implementing the D2S System, they experienced:
• 40% more accurate defect detection.
• 25% fewer unscheduled downtime incidents.
• Increased worker confidence in the reliability of inspection results.
How Analyst X Software Enhances Inspections
The D2S System integrates seamlessly with Analyst X software, providing technicians with easy-to-use tools for data analysis and reporting.
Key Benefits of Analyst X Software:
1. Real-Time Visualization: View B-scan results immediately, enabling quick and informed decision-making.
2. Customizable Reports: Generate detailed inspection reports to share with maintenance teams or management.
3. User-Friendly Interface: Designed for technicians of all experience levels, reducing the learning curve.
Smarter Inspections for Safer Operations
Dryer roll inspections are vital to keeping paper mills safe, efficient, and productive. While standard calibration methods may seem convenient, they fall short in accuracy and reliability. The D2S System, paired with the X3 Spider scanner and Analyst X software, offers a smarter way to inspect dryer rolls. By accounting for Snell’s Law and the unique properties of materials like cast iron, it delivers precise results every time.
Investing in better technology for inspections isn’t just a cost—it’s a way to protect your equipment, workers, and bottom line. Ready to learn more? Explore our Ultrasonic NDT Systems or Analyst X Software to see how we can help your paper mill thrive.


