Liquid penetrant testing (PT) uses special dyes to reveal surface-breaking cracks and defects in solid materials. PT is ideal for finding fine flaws like hairline cracks, porosity, and weld defects on metals or plastics without damaging the part.
Liquid Penetrant Testing is a widely-used non-destructive testing (NDT) method for inspecting parts. It involves applying a visible or fluorescent dye (penetrant) to a cleaned surface and letting it soak into any open defects by capillary action. After removing the excess dye and applying a white powder developer, trapped dye is drawn back out and marks the defect on the surface. This highlights any surface-breaking flaws (cracks, laps, porosity) that might not be visible to the naked eye.
How Liquid Penetrant Testing Works
Liquid penetrant inspection follows a step-by-step process. Each step ensures that any surface defects become visible:
- Surface Preparation: Thoroughly clean the test surface of oils, grease, paint, and rust. Any coating or dirt must be removed so the penetrant can enter cracks.
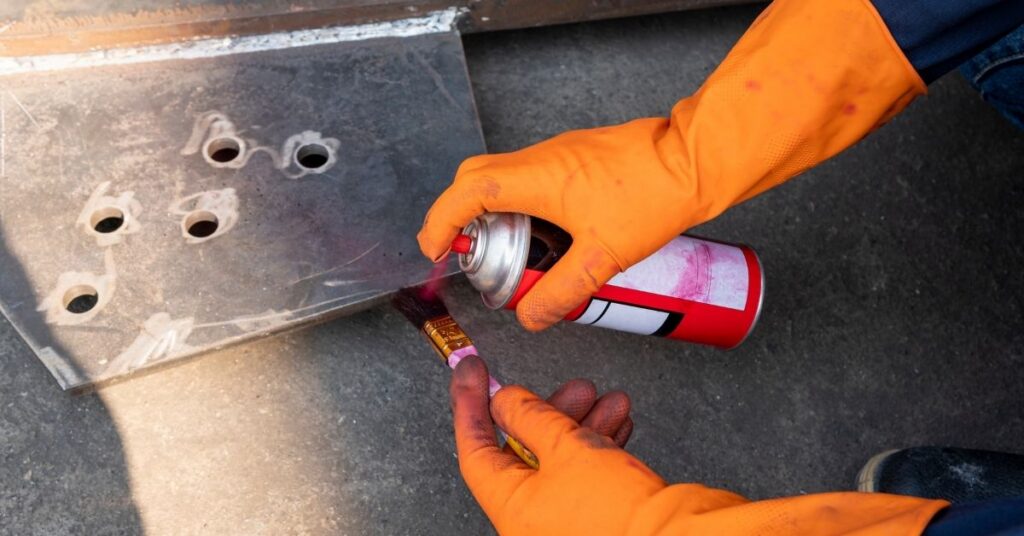
- Penetrant Application: Apply the penetrant liquid (spray, brush, or dip) and allow it to dwell on the surface. By capillary action, the low-viscosity dye seeps into any surface-breaking discontinuities. The dwell time lets the dye penetrate fine cracks.
- Excess Penetrant Removal: Carefully remove the excess dye from the surface (using a solvent or water wash) without flushing the penetrant out of defects. This step usually involves wiping and rinsing so that only dye trapped in defects remains.
- Developer Application: Apply a developer (often a white powder or liquid) to the surface. The developer draws any trapped penetrant out of the defects and spreads it on the surface, creating visible indications. Under proper lighting (UV light for fluorescent dyes or white light for visible dyes), the developer makes even very small flaws appear as colored marks.
- Inspection: Examine the part under the appropriate light to identify indications. Cracks and defects show up clearly against the white developer background.
- Post-Cleaning (optional): After documentation, clean off the penetrant and developer using solvents or detergents to restore the part’s surface. This often includes a final corrosion-proofing step for metal parts.
Each step is critical. For example, cleaning must remove any barrier so the dye can penetrate, and using the correct developer ensures even tiny traces of penetrant become visible.
Advantages and Limitations of Penetrant Testing
Advantages: Liquid penetrant testing offers several benefits for surface flaw detection:
- High Sensitivity: It can find extremely small surface cracks – as little as 150 nanometers wide. This makes PT one of the most sensitive methods for surface discontinuities.
- Versatility: Works on almost any non-porous material – metals, plastics, ceramics, etc. BINDT notes it can be applied to “any non-porous clean material, metallic or non-metallic”.
- Cost-Effective: Requires minimal, inexpensive equipment (penetrant dyes and developer). No heavy machinery is needed, making it low-cost per inspection.
- Large Area Coverage: Entire surfaces or multiple parts can be inspected at once, enabling quick inspection of large volumes of components.
- Visual Clarity: Defect indications are easy to see after the process, allowing inspectors to interpret results without complex analysis.
Limitations: There are trade-offs to consider:
- Surface-Only Detection: PT can only detect flaws that open to the surface. Subsurface cracks or voids cannot be found by PT. If internal defects are a concern, other methods (UT, RT) are needed.
- Material Restrictions: The surface must be non-porous and clean. Porous or very rough surfaces trap the dye and produce false indications. It also only works on materials that the penetrant and developer can wet effectively.
- Preparation and Safety: Requires careful cleaning and handling of chemicals. Some penetrants or solvents can irritate skin or eyes, so inspectors must use PPE and follow safety protocols.
- False Indications: Improper rinsing or drying can leave dye residue that mimics flaws, leading to false calls. Controlled conditions are needed for accurate results.
Despite these limitations, penetrant testing remains a simple and powerful inspection tool when used correctly. Its ability to highlight even the tiniest cracks makes it invaluable for many applications.
When to Use Liquid Penetrant Testing
Liquid Penetrant Testing is best used when early detection of surface flaws is critical. Typical scenarios include:
- Weld Inspections: Checking weld beads for cracks or lack of fusion on pipelines, pressure vessels, and structural welds.
- Castings and Forgings: Inspecting automotive and aerospace components (engine parts, turbine blades) for shrink cracks or porosity after casting or machining.
- Manufacturing Quality Control: Verifying finished parts (shafts, bolts, weldments) are free of surface defects before assembly.
- Maintenance Checks: Routine inspections in petrochemical, power generation, or marine industries to find cracks that could lead to leaks or failures.
Because PT can be done on-site with minimal equipment, it’s popular in field inspections. For example, aerospace technicians often apply fluorescent dye and use UV light to inspect aircraft components during maintenance.
| NDT Method | Detects | Materials | Key Advantage | Limitation |
|---|---|---|---|---|
| Liquid Penetrant (PT) | Surface-breaking cracks, laps, porosity | Non-porous (metals, plastics) | Extremely sensitive to tiny surface flaws | Only surface flaws; requires clean surface |
| Magnetic Particle (MT) | Surface and slightly subsurface cracks | Ferrous metals only | Quick and easy surface crack detection | Only on ferromagnetic materials |
| Eddy Current (ET) | Surface & near-surface defects | Conductive materials | Can detect thin coatings, high-speed | Limited penetration depth into material |
| Visual (VT) | Visible surface defects | All (with tools) | Immediate, no equipment needed | Only obvious flaws detectable |
The table above highlights how penetrant testing compares to other common methods for surface defects. PT is uniquely sensitive on any clean non-porous material, whereas methods like MT and ET are limited by material type.
Frequently Asked Questions (FAQ)
What is liquid penetrant testing used for?
Liquid penetrant testing (PT) is used to find surface-breaking defects like cracks, laps, and porosity on metal or plastic parts. By drawing a dye into any flaw and then revealing it with a developer, PT helps inspectors see tiny cracks or weld defects that are invisible without inspection.
Which materials can be inspected with liquid penetrant testing?
Any clean, non-porous material can be tested. This includes most metals (steel, aluminum, titanium), plastics, and ceramics. The key is a smooth surface: the penetrant and developer must be able to wet the material. It won’t work on porous materials like wood, concrete, or heavily rusted surfaces.
Can liquid penetrant testing detect internal defects?
No. PT only reveals flaws that are open to the surface. If a crack or void is completely buried under the surface, the dye cannot reach it. Internal defects require other methods (e.g. ultrasonic or radiographic testing).
What are the advantages of liquid penetrant testing?
Penetrant testing is highly sensitive and can detect very fine surface cracks (down to nanometers). It’s also inexpensive (just liquids and basic tools), and can cover large or complex-shaped parts. Many industries value PT because it is easy to perform and provides immediate visual results.
Is liquid penetrant testing safe?
The test itself is non-destructive and does not harm the part. However, PT uses chemical penetrants and solvents, which can be hazardous. Technicians should wear gloves and eye protection and follow safety procedures. All penetrant residues must be cleaned and disposed of properly.